Table of Contents
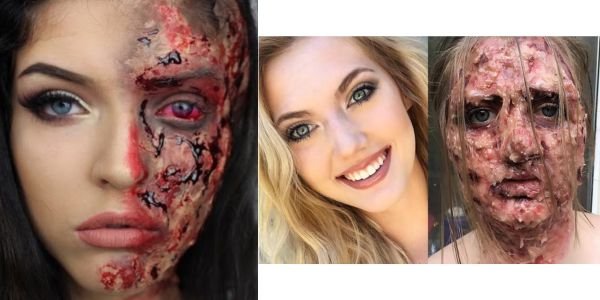
Halloween offers an exciting opportunity for makeup enthusiasts to showcase their skills, especially when it comes to creating realistic and horrifying effects. One such disturbing makeup look that has gained popularity in horror circles is the “degloved face” look. This tutorial will guide you step by step to achieve a terrifyingly realistic degloved face makeup look.
Disclaimer: The following tutorial aims to create a fictional and horror-themed appearance. It’s essential to approach this tutorial with sensitivity and discretion. The goal is to celebrate the art of makeup and not trivialize serious injuries.
Materials Needed:
- Liquid latex or gelatin-based prosthetics
- Red, blue, purple, and black cream-based makeup
- Tissue paper or cotton balls
- Makeup sponges and brushes
- Fake blood
- Face powder
- Spirit gum or another adhesive (if using gelatin-based prosthetics)
- Setting spray
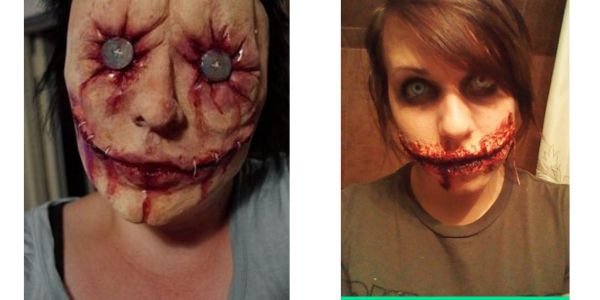
Steps:
- Preparation: Start with a clean and moisturized face. It helps if your hair is pulled back and out of the way to prevent it from sticking to the makeup.
- Base Layer: Apply a thin layer of liquid latex or gelatin to the areas you want to deglove (usually around the cheeks, jawline, and forehead). Be very careful around the eyes and mouth.
- Tissue/Cotton Application: While the base layer is still wet, place torn pieces of tissue paper or small cotton balls onto the latex or gelatin. This will give a texture resembling torn skin and muscle.
- Sealing: Apply another layer of liquid latex or gelatin over the tissue/cotton to seal it in place. Allow it to dry thoroughly. If using gelatin-based prosthetics, make sure it’s set before moving on.
- Color Application: Start with the red cream makeup, and dab it onto the areas where the tissue or cotton is visible. This creates the appearance of raw flesh. Then, use the blue and purple makeup to create the illusion of veins and bruised skin around the edges of the degloved areas.
- Depth and Realism: Using the black cream makeup, accentuate the deepest parts of the wounds and create shadow effects around the edges. This gives depth and adds realism to the appearance.
- Fake Blood: To elevate the gory look, generously apply fake blood to the degloved areas. Allow some drips for a more realistic effect.
- Powder & Setting: Dust face powder over the makeup to reduce shine and make the skin look more natural. Finish with a setting spray to ensure the makeup lasts all night.
- Final Touches: You can add contact lenses, a torn costume, or other props to enhance the overall horrifying effect.
Safety Tips:
- Always do a patch test with any new product to ensure you don’t have an allergic reaction.
- Keep all materials, especially liquid latex, and fake blood, away from the eyes.
- If using gelatin, ensure it’s not too hot before applying it to the skin.
Remember, Halloween makeup is all about having fun and expressing creativity. Ensure you warn your friends and family about your look, so you don’t give them too much of a fright! Enjoy the process and have a spooktacular Halloween!
10 ideas for “Degloved Face Makeup Tutorial”:
- Zombie Degloved Face: Combine the degloved look with zombie features, such as sunken eyes, pale skin, and rotting flesh details.
2. Post-Accident Survivor: Add additional injuries like “broken” nose makeup, “blackened” eyes, or “cuts” elsewhere to depict someone who survived a severe accident.
3. Exposed Machinery: Create the illusion that beneath the skin, there are mechanical parts or wires, suggesting a cyborg or robot.
4. Parasite Infestation: Add makeup details that mimic worms or other parasites “living” in the degloved sections of the face.
5. Glowing Underneath: Use glow-in-the-dark makeup products to give the appearance that the underlying layer of the degloved section glows eerily in the dark.
6. Stitched Back: Incorporate makeup or prosthetics that resemble stitches, giving the appearance that someone tried to “stitch” the skin back onto the face.
7. Crystal Growth: Instead of muscles or tissues underneath, show “crystal” or “gem” growths, hinting at a fantasy curse or magical transformation.
8. Eldritch Transformation: Incorporate tentacles, scales, or other Lovecraftian features emerging from the degloved sections.
9. Frostbite Version: Use blue and white tones to give the impression that the face got degloved due to severe frostbite.
10. Poisonous Effect: Show “veins” spreading out from the degloved area in green or other unnatural colors, indicating a poisonous or venomous reaction.
Creating unique makeup looks requires a blend of technique, creativity, and patience. For each of the ten variations on the degloved face idea mentioned previously, here’s a brief step-by-step guide:
1. Zombie Degloved Face:
– Follow the basic degloved face tutorial.
– Pale out your skin using a light foundation or white face paint.
– Add dark purples and blacks under the eyes for a sunken look.
– Create “wounds” using reds and purples.
2. Post-Accident Survivor:
– Follow the basic degloved face tutorial.
– Use purples, blacks, and yellows around the eyes for a “bruised” appearance.
– Create a “broken nose” using shading with dark makeup down the sides.
3. Exposed Machinery:
– Begin with the degloved face steps but leave spaces.
– Draw or stick on metallic-looking designs or gears where the skin is missing.
– Use silver and gold highlights.
4. Parasite Infestation:
– Follow the basic degloved face tutorial.
– Paint or attach rubber worms, maggots, etc., to the exposed areas.
– Add redness around each “parasite” to give an irritated look.
5. Glowing Underneath:
– Follow the degloved face process.
– Apply glow-in-the-dark makeup or paint in the open sections.
– Enhance the look by setting it under black light.
6. Stitched Back:
– Begin with the degloved face makeup.
– Paint or attach fake stitches across the edges of the degloved areas.
– Add redness around stitches to make them appear inflamed.
7. Crystal Growth:
– After the basic degloved face steps, instead of muscles, glue on faux crystals.
– Use shimmer or glitter around the edges for a magical feel.
8. Eldritch Transformation:
– Follow the degloved face tutorial.
– Attach tentacle prosthetics or paint them emanating from degloved areas.
– Add scales using fishnet stockings as a stencil and layering different colored makeups.
9. Frostbite Version:
– Begin with the degloved makeup process.
– Apply blue and white makeup in patches, especially around the edges.
– Add shimmer or white highlights for an icy touch.
10. Poisonous Effect:
– Follow the basic degloved face steps.
– Paint green, blue, or purple “veins” extending from the degloved sections.
– Add a shimmering green highlight to give a venomous appearance.
Remember to seal all these looks with a setting spray to ensure longevity. Additionally, doing a patch test for any new product is crucial to avoid allergic reactions. Given the detailed nature of these looks, practicing beforehand will help achieve a more polished result on the day of the event.
Also, visit Engineering Hulk for more articles


