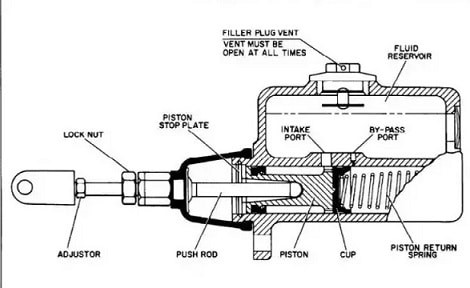
The brake master cylinder is the part that converts the force of your foot on the brake pedal into hydraulic pressure in the brake lines. It is a piston moving inside a bore full of brake fluid; the piston displaces fluid, the fluid cannot compress, so pressure rises equally throughout the system and pushes the caliper or wheel cylinder pistons against the friction material. On a modern car the master cylinder is a tandem unit with two pistons feeding two independent circuits, so a leak in one half still leaves you with brakes on two wheels.

Everything downstream of the master cylinder is just plumbing and pistons. If the master cylinder cannot build or hold pressure, nothing else in the brake system matters, which is why it is usually called the heart of the hydraulic brake.
What does a brake master cylinder do?
It does four separate jobs, and students usually only remember the first one.
- Converts force into pressure. A small piston area turns a modest pedal force into a high fluid pressure.
- Distributes that pressure equally. Pascal’s law sends the same pressure to every wheel on the circuit, whatever the pipe length or routing.
- Multiplies force at the wheel. The caliper pistons are much larger than the master cylinder piston, so the force they produce is far larger than the force that went in.
- Stores and recovers fluid. The reservoir tops up the system as pads wear and takes fluid back when the pads retract and the brakes release.
Working principle: Pascal’s law applied to brakes
Pascal’s law says that pressure applied to a confined fluid is transmitted undiminished to every point in that fluid. In a brake system it gives two simple relations.
Pressure, p = F ÷ A — the pushrod force divided by the master cylinder piston area.
Output force, Fout = p × Aout — that pressure acting on the caliper piston area.
Combine them and you get the hydraulic advantage: Fout ÷ Fin = Aout ÷ Ain. The area ratio is the whole trick. Nothing is gained for free, of course; the caliper piston moves a much shorter distance than the master cylinder piston, which is exactly why the pedal travels several centimetres while the pad moves a fraction of a millimetre.
Worked example: foot to caliper
Take a car with a 20 mm master cylinder bore, a pedal lever ratio of 5:1 and a single-piston floating caliper of 54 mm bore. The driver presses with 300 N, which is roughly 30 kgf.
- Pedal lever. Pushrod force = 300 N × 5 = 1500 N. The pedal is a simple lever, and its ratio is set by where the pushrod clevis sits relative to the pivot and the pad.
- Master cylinder area. A = π/4 × 20² = 314.2 mm².
- Line pressure. p = 1500 ÷ 314.2 = 4.77 N/mm² = 47.7 bar. That same pressure now exists at every caliper on the circuit.
- Caliper piston area. A = π/4 × 54² = 2290 mm².
- Clamping force. F = 4.77 × 2290 = 10 930 N, close to 11 kN per caliper.
The hydraulic advantage on its own is 2290 ÷ 314.2 = 7.29. Multiply by the 5:1 pedal ratio and the foot force has been multiplied about 36 times before any brake booster is involved.
Now add a vacuum booster with an assist ratio of about 2.5. The pushrod force becomes 3750 N, line pressure rises to roughly 119 bar and the clamping force to about 27 kN. That is why a panic stop in a boosted car needs a firm push rather than a heroic one, and why the pedal suddenly feels like concrete when the engine stalls and the booster’s vacuum reserve runs out after two or three applications.
Student tip: a smaller master cylinder bore gives higher pressure for the same foot force but demands more pedal travel. Brake design is always this trade between pressure and travel, and it is the usual reason a tuner who fits big calipers ends up with a long, soft pedal.
Construction: parts of a master cylinder
| Part | Function |
|---|---|
| Reservoir | Holds spare fluid above the cylinder, usually translucent plastic with MIN and MAX marks and a vented or diaphragm cap. On a tandem unit it is internally divided so that a leak in one circuit cannot drain the other. |
| Compensating port (bypass / relief port) | The small forward port connecting reservoir to bore. With the pedal released it is open, so the circuit stays at atmospheric pressure and fluid can expand or contract with temperature. Closing this port is the moment pressure starts to build. |
| Feed port (inlet / intake port) | The larger rear port that keeps the chamber behind the primary cup permanently flooded with fluid, ready to refill the pressure chamber during release. |
| Piston | Moves in the honed bore and displaces fluid. A tandem cylinder has two in series: primary (pushrod end) and secondary (floating). |
| Primary cup (main seal) | The pressure seal. Its lip faces the pressure chamber, so pressure presses the lip harder against the bore. It seals in one direction only and can flex inward to let fluid pass the other way during recuperation. |
| Secondary cup | The outer seal at the rear of the piston. It keeps fluid inside the cylinder and dirt outside, and stops leakage past the pushrod end. |
| Return spring | Pushes the piston back to its rest position when the pedal is released, fast enough to create a slight depression that draws fluid in past the primary cup. |
| Circlip / stop washer | Retains the piston assembly in the bore and sets the rest position. If the piston is not allowed to return fully, the compensating port stays covered and the brakes drag. |
| Pushrod and boot | Transfers pedal or booster force to the primary piston. The rubber boot keeps water and grit out of the bore. Pushrod length is adjustable on many units and is set so there is a small free play. |
| Residual pressure valve | Fitted in drum brake outlets on older designs. It holds a small residual pressure in the line, of the order of 0.4 to 0.7 bar (6 to 10 psi), so the wheel cylinder cups stay expanded against the bore and air is not drawn in. It is never used on disc circuits, because residual pressure there would keep the pads rubbing. |
| Body | Cast iron or aluminium alloy, with the bore honed to a fine finish. Outlet ports carry inverted flare fittings for the steel brake pipes. |
How a master cylinder works, stroke by stroke
The full cycle has four stages. The interesting one is the second.
1. Rest
The return spring holds the piston fully back against the circlip. The primary cup sits just behind the compensating port, so reservoir and cylinder are connected. Line pressure equals atmospheric. Fluid can flow either way, which lets the brake fluid expand when hot without applying the brakes by itself.
2. Apply stroke
The pushrod moves the piston forward. For the first two or three millimetres nothing happens to pressure: the primary cup is still behind the compensating port and any fluid the piston displaces simply goes back into the reservoir. The instant the lip of the primary cup travels past the compensating port, the chamber is sealed and pressure begins to rise. From there, every further millimetre of travel pushes fluid down the lines, takes up the pad clearance, and then loads the pads against the disc. That dead travel before the port closes is the free play you feel at the top of the pedal, and it is why a mis-adjusted pushrod ruins a brake system in one direction or the other.
3. Hold
Hold the pedal still and the system is static. Pressure is the same at the master cylinder and at every caliper on that circuit. A sealed system will hold this pressure indefinitely; if the pedal slowly sinks while you hold it, you have found a fault, not a feature.
4. Release and recuperation
Lift your foot and the return spring drives the piston back faster than fluid can return through the long brake pipes. That leaves a slight vacuum in front of the piston. Fluid from the always-flooded chamber behind the piston flexes the lip of the primary cup inward and flows forward through the holes in the piston head to fill the gap. This is recuperation, and it is the reason the system can never end up short of fluid. A moment later the piston clears the compensating port, the surplus fluid returned from the lines flows back into the reservoir, and pressure settles at atmospheric again.
The same mechanism handles pad wear automatically. As the friction material thins, the caliper pistons sit further out and the system needs more fluid to stay full, so the fluid level in the reservoir drops steadily over the life of a set of pads. A reservoir that is low with no visible leak usually means worn pads, not a burst pipe. It is also why you should never top up the reservoir just before fitting new pads: pushing the pistons back will then overflow it.
Single-acting vs tandem master cylinder
A single-acting (simplex) master cylinder has one piston and one circuit feeding all four wheels. It is simple and cheap, and it is also a single point of failure: one burst pipe, one leaking wheel cylinder, and the pedal goes to the floor with no braking at any wheel. It survives today only on older vehicles, some tractors, and as the clutch master cylinder, where a failure is inconvenient rather than lethal.
A tandem (dual) master cylinder puts two pistons in one bore, in series, each feeding its own circuit from its own reservoir compartment. Dual-circuit braking has been a legal requirement on cars in most markets for decades for this reason.

How the tandem unit drives two circuits
The pushrod acts on the primary piston only. Between the primary and the secondary piston there is a chamber of trapped fluid and a spring. When the primary piston moves forward and its cup passes the compensating port, the fluid it traps cannot escape, so it behaves like a solid rod and pushes the secondary piston forward too. The secondary piston then closes its own compensating port and pressurises the second circuit. Both circuits therefore reach very nearly the same pressure at the same time, even though only one piston is being pushed by your foot.
What happens when one circuit fails
| Failure | What happens inside | What the driver feels |
|---|---|---|
| Secondary (front) circuit leaks | The primary piston moves forward but cannot build pressure through the trapped fluid, because the secondary piston just slides ahead into the empty circuit until it bottoms metal-to-metal against the end of the bore. Only then does the primary circuit start to pressurise. | Long pedal travel, then a firm pedal with roughly half the braking. The pedal may feel almost normal at the end of its stroke. |
| Primary (rear) circuit leaks | The primary piston travels without pressurising anything until it makes mechanical contact with the secondary piston, then pushes it directly. The secondary circuit works normally from that point. | The same symptom: a lot of lost travel, then brakes. Stopping distance roughly doubles. |
In both cases you lose pedal travel, not brakes. That is the entire design intent, and it is also the reason a car with a low, long pedal that still stops should be treated as a failed circuit until proved otherwise. A brake warning lamp driven by a pressure differential switch normally lights at the same time.
Split layouts: diagonal (X) vs front and rear (H)
| Front/rear split (H or II split) | Diagonal split (X split) | |
|---|---|---|
| Circuit 1 | Both front wheels | Front right + rear left |
| Circuit 2 | Both rear wheels | Front left + rear right |
| Braking left after a failure | About 70-80% if the fronts survive; only about 20-30% if you are left with the rear circuit alone | About 50% in either case, because each circuit always keeps one front wheel |
| Pull under failure | Straight, no yaw | Yaw towards the working front wheel, which the driver must correct |
| Typical use | Rear-wheel-drive cars and commercial vehicles with a long wheelbase | Front-wheel-drive cars, which is most of the Indian market |
Diagonal splitting became standard on front-wheel-drive cars for one blunt reason: on an FWD car with its engine and gearbox over the front axle, weight transfer under braking loads the front tyres so heavily that the rear axle contributes only a small share of the stopping force. If an H-split car lost its front circuit, the two rear wheels alone might give a fifth of normal braking. An X-split guarantees one front wheel in every circuit, so no single failure can strip away the wheels that do the real work.
The yaw that comes with an X-split is handled in the suspension, not the brakes. FWD cars are designed with a negative scrub radius so that the braking force at one front wheel generates a steering moment that pulls the car back straight instead of dragging it sideways. This is one of the neater pieces of chassis design in an ordinary hatchback.
Brake fluid: grades, boiling points and why it absorbs water
The fluid is part of the machine, not a consumable afterthought. It has to be nearly incompressible, stable at high temperature, non-corrosive to the metals, and compatible with every rubber seal in the system. Glycol-ether fluids under the US FMVSS 116 standard are graded by boiling point.
| Grade | Base | Min dry boiling point | Min wet boiling point | Notes |
|---|---|---|---|---|
| DOT 3 | Glycol ether | 205 °C | 140 °C | The common fitment on older and lightly loaded vehicles. |
| DOT 4 | Glycol ether with borate esters | 230 °C | 155 °C | Standard on most modern cars and on ABS-equipped vehicles. Mixes with DOT 3. |
| DOT 5.1 | Glycol ether, low viscosity | 260 °C | 180 °C | Same chemistry family as DOT 3 and 4, higher boiling point, thin enough for fast ABS and ESC valve response. |
| DOT 5 | Silicone | 260 °C | 180 °C | Not part of the 3 / 4 / 5.1 series. Does not absorb water and does not attack paint, but it is slightly compressible when hot and traps air easily. |
Never mix DOT 5 silicone fluid with DOT 3, DOT 4 or DOT 5.1. They are immiscible. Mixing them produces a fluid that can gel, swells the wrong seals and can leave you without brakes. The numbering is genuinely misleading here: DOT 5.1 is glycol and belongs with DOT 3 and DOT 4, while DOT 5 is silicone and belongs with nothing.
Why hygroscopic fluid matters
Glycol brake fluids are hygroscopic: they pull moisture out of the air, through the reservoir cap vent, through flexible hose walls and past every seal. A typical fluid picks up 2 to 3% water over two years, and that is the difference between the dry and wet boiling points in the table above. A DOT 4 fluid that started at 230 °C can be down near 155 °C once it is wet.
Now think about what that means during a long descent or repeated hard braking. Heat soaks from the disc into the caliper and into the fluid sitting in the caliper passages. If that fluid boils, it turns to vapour, and vapour is compressible. The pedal goes straight to the floor because your foot is now compressing gas instead of moving fluid. This is vapour lock, and it is the specific reason brake fluid is replaced on a time interval rather than a wear interval. Water in the fluid also corrodes the cylinder bores, the ABS modulator valves and the steel pipes from the inside.
Replace brake fluid every two years as a general rule, and follow the manufacturer’s schedule where it is shorter. Always use fluid from a sealed container; an opened bottle sitting on a workshop shelf has been absorbing water since the day it was opened.
The brake booster and the master cylinder
The vacuum booster (servo) sits between the pedal and the master cylinder, bolted to the bulkhead with the master cylinder bolted to its front face. Inside is a large diaphragm with engine manifold vacuum on both sides at rest. Press the pedal and a valve lets atmospheric air into the rear chamber, so the pressure difference across the diaphragm, typically 0.5 to 0.7 bar acting over a diaphragm of 200 mm to 230 mm diameter, adds well over a thousand newtons of assistance to the pushrod. Twin-diaphragm boosters double the effective area in the same length.
Three consequences worth remembering:
- The booster multiplies force before the master cylinder. It does not change the hydraulics at all; the master cylinder simply sees a bigger pushrod force.
- Booster assistance depends on manifold vacuum, so a diesel engine needs a dedicated vacuum pump. A check valve in the hose holds enough vacuum for two or three assisted applications after the engine stops.
- A leaking master cylinder rear seal can pull brake fluid into the booster through the pushrod bore. A booster that has fluid inside it, or an engine that idles roughly when the brake is pressed, points at the master cylinder or the booster diaphragm.
On cars with ABS, the master cylinder feeds the hydraulic modulator rather than the calipers directly, and during an ABS event the return pump sends released fluid back towards the master cylinder. That is what you feel as the pedal pulsing under your foot. Everything described on this page still applies; the anti-lock braking system only intercepts the pressure the master cylinder has already created.
Common master cylinder faults and symptoms
| Symptom | Most likely cause | What to check |
|---|---|---|
| Pedal sinks slowly to the floor under steady foot pressure, no external leak, fluid level normal | Master cylinder cups bypassing internally: fluid is slipping past the worn primary cup from the pressure side back to the reservoir side | The classic master cylinder failure. Clamp off the flexible hoses one at a time; if the pedal still sinks with everything clamped, the master cylinder is the fault. Replace it, do not rebuild a scored bore. |
| Spongy or springy pedal | Air in the system; occasionally a swollen flexible hose or boiled fluid | Bleed the system in the correct sequence. Air is compressible, so pedal travel goes into squashing bubbles instead of moving fluid. |
| Low pedal, fluid level dropping | External leak at a pipe, hose, wheel cylinder or caliper seal; or worn pads taking up fluid | Inspect all four wheels and the pipe runs for wet patches. Measure pad thickness before condemning anything. |
| Pedal hard, poor braking | Failed booster, collapsed vacuum hose or blocked check valve | With the engine off, pump the pedal to exhaust vacuum, hold the pedal down and start the engine. The pedal should sink a little. If it does not, the booster is not assisting. |
| Brakes drag, wheels hot, car pulls slowly to a stop | Compensating port blocked or kept covered by an over-adjusted pushrod, so pressure cannot release | Check pedal free play and pushrod length. Open a bleed nipple: if fluid squirts out and the wheel then frees off, trapped pressure was the cause. |
| Fluid dark, cloudy or gritty, reservoir sludged | Contaminated fluid, water absorbed over years, or swollen rubber from petrol or mineral oil getting in | If mineral oil or petrol has entered, every rubber part in the system swells and must be replaced, not just flushed. Fluid contaminated only by age and water needs a full flush. |
| Brake warning lamp on, pedal lower than usual | One circuit has failed; the pressure differential switch has tripped | Do not drive it. Find the leak, repair it, then bleed and reset the differential valve. |
Bleeding: why air is fatal in a hydraulic system
Brake fluid is effectively incompressible, so a column of fluid transmits pedal movement almost perfectly. Air is not. A gas bubble compresses under pressure, and every millimetre of pedal travel spent squashing that bubble is travel that never reaches the pads. A small amount of air gives a spongy pedal; enough air gives you a pedal that reaches the floor with a working, leak-free system.
Bleeding pushes that air out through the bleed nipples. Points that matter:
- Work in the manufacturer’s sequence. The common default is furthest wheel from the master cylinder first, then progressively nearer, but many cars with X-split circuits and ABS specify their own order. Follow the manual.
- Never let the reservoir run dry during bleeding, or you will draw fresh air into the master cylinder and start again.
- Bench-bleed a new master cylinder before fitting it. Air trapped in the cylinder itself is very hard to shift once the unit is on the car.
- ABS modulators can hold air in their valve blocks and accumulators. Some vehicles need a scan tool to cycle the pump during bleeding.
- Do not press the pedal to the floor on an old, high-mileage car during manual bleeding. The piston then travels into a part of the bore it has never reached, where corrosion and deposits can cut the cup and cause the very failure you were trying to avoid.
- Catch the old fluid and wipe up spills. Glycol brake fluid strips paint quickly and is harmful if swallowed.
Maintenance intervals
- Every service: check the fluid level and colour, look for damp patches at the master cylinder rear boot and pipe unions, and check pedal feel and free play.
- Every two years: replace the brake fluid completely. Some manufacturers specify a shorter interval, and hilly regions or heavy towing justify an earlier change.
- Test the fluid’s water content with a refractometer or an electronic tester if you are unsure of its age; above about 3% water it should be changed regardless of how it looks.
- Replace rather than rebuild a master cylinder with a pitted or scored bore. Seal kits are only worth using on a bore that is still smooth, and on a vehicle that is worth the labour.
- Replace flexible hoses when they are swollen, cracked or perished. A hose that balloons under pressure absorbs pedal travel exactly like air does, and one that has collapsed internally can hold pressure at a caliper after you release the pedal.
For related theory on the non-hydraulic side of the system, see mechanical brakes in automobile engineering.
References
- AICTE Model Curriculum – Automobile Engineering, for the diploma and B.Tech syllabus context.
- FMVSS 116 (49 CFR 571.116), Motor vehicle brake fluids – dry and wet equilibrium reflux boiling point limits for DOT 3, DOT 4, DOT 5 and DOT 5.1.
FAQs
What does a brake master cylinder do?
It converts the mechanical force of the brake pedal into hydraulic pressure. A piston moves inside a fluid-filled bore, and because brake fluid cannot be compressed, Pascal’s law sends the same pressure to every caliper or wheel cylinder on that circuit, where larger pistons multiply it into clamping force.
What is the difference between a single and a tandem master cylinder?
A single-acting cylinder has one piston feeding all four wheels, so one leak removes all braking. A tandem cylinder has two pistons in series, each serving an independent circuit with its own reservoir compartment. If one circuit fails, the other still brakes two wheels, at the cost of extra pedal travel.
Why does the brake pedal slowly sink to the floor with no leak?
Almost always because the master cylinder cups are bypassing internally. The worn primary cup lets fluid slip past it back into the reservoir side instead of holding pressure, so the pedal creeps down under steady foot pressure while the fluid level stays normal. The cylinder needs replacing.
What is the compensating port in a master cylinder?
It is the small port linking the reservoir to the cylinder bore, open when the pedal is at rest. It lets fluid expand and contract with temperature and lets fluid return on release. Pressure only starts to build the moment the primary cup travels past this port during the apply stroke.
How often should brake fluid be changed?
Every two years for glycol fluids such as DOT 3, DOT 4 and DOT 5.1, or sooner if the manufacturer says so. These fluids are hygroscopic and absorb water from the air, which drops the boiling point from the dry figure to the wet figure and risks vapour lock during hard or prolonged braking.